Satellite Tron Client and Server Quick Start Guide Video
Satellite Tron Client and Server Quick Start Guide Video
This quick start guide will help you install and configure the Satellite Tron client and server software.
1. The Satellite Tron TI Sensor Tag is a remote sensor for temperature, humidity, ambient light, Sensor Tag key buttons, magnet-reed-switched and other collected environment information.
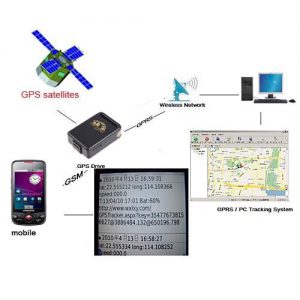
2. The Satellite Tron-TI Client that you install on an Android device. This will send GPS position and relay remote TI-Senor Tag data to the Satellite Tron Server via the WiFi or cell tower network from anywhere in the world.
3. The Satellite Tron Server is the live map GPS tracking program that ties all this information together on your PC.
1. To install the Satellite Tron Server program on your computer, download the eospy.exe installation program, and click on the installation program to start. To start the Satellite Tron Server, click on the Eagle icon on your desktop. The Satellite Tron map will appear.
2. To install the Satellite Tron-TI Client application on your phone, download the Satellite Tron application from the Google App Store. There are two Satellite Tron Client apps available in the Google App Store. The Satellite Tron Client that works with your Android phone. It will send GPS, temperature, humidity, and ambient light data from your phone to the Satellite Tron Server. And the Satellite Tron-TI Client app that sends GPS and relays sensor data from your TI-Sensor Tag to your Satellite Tron Server program. That’s the one we are going to install. To start the Satellite Tron Client, click on the Eagle icon on your phone. The Satellite Tron Client Scan screen will appear.
To pair the TI-Sensor Tag to the Satellite Tron-TI App, start the device discovery scanning and press the discovery button on the TI-Sensor Tag. The green L E D will start blinking. The available sensors will display. You can see you have temperature, humidity, movement, ambient light, and key press along with read-switch. I can cover the light sensor with my finger, and you can see the sensor change.
To configure a new Satellite Tron Client you will need to enter the Satellite Tron Server IP address into the Server address, I’m going to change the frequency of sending, and the change to GPRS/GPS since we are indoors.
Next, I will add this new device into the Satellite Tron Server by creating the Device name and entering the Device identifier number.
At this point, we are done with the configuration. All you need to do is to swipe the Service Status On. The device will then appear on the map the next time it sends GPS positioning.